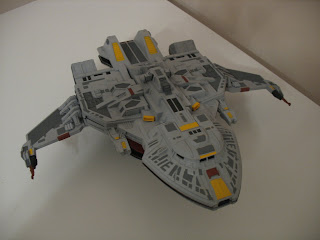
A model blog to the making of the Maquis Raider! This model can be seen in Star Trek; The Next Generation, Deep Space 9 and Voyager.

Replacement Parts Arrived!

Of course the day after I made all the necessary drilling/cutting. The parts I've been waiting for arrived @@ ($30 USD with shipping)

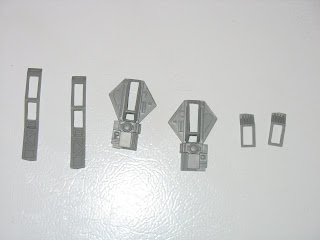
So I start testing how the parts would look with LEDs. For the impulse engines (red), there's an option of using the original parts filled with epoxy in the gap and light it up with red LED behind it (option 1), or filled with epoxy and paint with "clear red" paint from Tamiya and light with red LED behind (option 2).


From Left to right, option 2, 1 and (3+4)


Right: Option 1 (epoxy only)
Left: Option 2 (epoxy with clear red paint)

OR


(Replacement part for impulse engine)
Option 3: no epoxy (left)
Option 4: with epoxy (right)
The options for replacement parts are: without epoxy (option 3) and with epoxy (option 4). I think option 4 looks the best, but options 1 + 2 looks just as good. The clear red paint looks better in the unlit lighting (the replacement parts look pinkish under normal light), so I'll probably go with option 2.


Left: original part
Right: replacement

Then follows comparision for the warp engines. For this, the replacement parts are casted in solid clear blue resin and the grill lines are also blue. When it is lit, the grill effect is gone compared to the original parts filled with epoxy + blue LED. I want my grill lines LOL....So original parts is what I'll be picking.

One of the problem for choosing the original parts and lighting it up is the wing assembly requires a gap within the warp engines to attach to the main hull. When you start cutting holes out of the ship to allow light to shine through, you're cutting away the very thing that's holding the wing to the ship.

The replacement parts did a better job in solving this solution by having holes within the cast to allow wing attachment. I have yet to figure a way to solve this problem yet, perhaps I just need to be very selective on the areas that i'm cutting out on the main hull. I'll ponder this while I do something else on this project.

So what have we learn? Wasted $30 to find out doing it yourself and stop being lazy works just as well.... but I think it took 6-8hrs+ just to do all the cutting and drilling. So you decide.

Impulse Engines! Part 1

Here are the impulse engines and their parts. Basically a progress of cutting the gaps out.


(The finished pieces)

I finally gave in and used a dremel on the main hull cuz drilling those holes is pretty darn tedious..... However, for those smaller pieces of the impulse engines, I wouldn't recommend using a dremel (unless you've got really really really steady hands).


(Impulse engine Gaps cut out on the main hull)

(Impulse Engine Assembly-Whole)

At this point, I still need to cut out the gaps for the warp engines, "back engines"?! and misc holes for blinking/stationary lights.

Bulk Candid Shots!

Despite having some missing parts unpainted and windows unlit.... it's always fun to take pictures of the overall model. So here they are!

After some touch up paint, I took better pictures =D So here they are again!


=D

Wings and Misc Parts Painted!

Because it was Superbowl Sunday and we're having guests coming over... I was forced to clean up my mess so i turned on the overdrive and decided to get the bulk of my paintings done.

The process is still the same as before, tape it down, do layer painting. I added a new brown/red colour for the main energy cannons. For the misc parts and where they go, they can be found in the instructions page. It's up to you what colour you choose to paint these parts. =D

Display Stand!

The display stand is actually the first thing that I worked on.... It's simple, easy and it's got the Maquis symbol as the main design.

So I looked up the Maquis symbol on the web, so I used the same colour scheme as my colour.


Like usual, I taped it down and do my colour layer spray painting. I finished it off with a clear coat to give that shine =D

Main Power Switch!

I'm using a push switch for the main power switch. Originally I wanted to hide it underneath the "deflector shield housing" that is behind the main bridge (See part 8 on instructions) and leave it unglued as a removable part. After some thought, any removable part usually end up getting lost... so I decided to cut a hole where the switch would pop out.

I then filled with putty to fill in the gaps and then spray paint to mask the difference in colours.


This is the underside of the switch.